Ever wonder if there was an easy way to replace those bearings in your nitro motor? Well let me teach you a few tips and tricks that have served me well. All of these tips will refer to my OS55 since this is the motor I have the most experience with. Before you start dissembling the motor, go preheat your oven to 350 degrees fahrenheit. Just trust me on this one…
Next, start by removing the back plate, head, and anything that is mounted on the crank such as the fan or clutch. These should all be very straight forward. Next, we are going to remove the liner. The trick to this is to use a small zip tie and place it in the exhaust port of the motor. Then turn the crank over to raise up the piston and this will pop the liner right up.
Once the liner is removed, you can easily remove the piston by sliding it off the crank and out through the top. Now, with a little force you should be able to slide the crank right out the back. At this point we should have just the engine case with the bearings installed. This is where the oven comes in! Place the case on a cooking sheet and place it in the oven for about 10-15 minutes.
As soon as you place the case in the oven, take the new larger bearing and slide it on to the crank all the way. Then place the crank with the large bearing on it, and the new small bearing in the freezer. After 15 minutes, go ahead and remove the case from the oven. To remove the large bearing give the case a good hard smack on the counter and the large bearing should fall right out (If it doesn’t, place the case back in the oven for 10 minutes and try again). To remove the small bearing, use a tool that will just catch the inner diameter of the bearing and gently tap it out. I usually like to use a nut driver and a rubber mallet.
The next step is to install the new bearings. I usually start with the small bearing, which should just slide right in to place. As for the large bearing, since it is frozen on the crank just go ahead and start to slide the crank in as usual, which will make the alignment for this larger bearing perfect. The larger bearing should slide right in to place as well. If either of the bearings doesn’t easily slide in, don’t worry! Just place the case back in the oven and the bearing in the freezer for a bit, then try again.
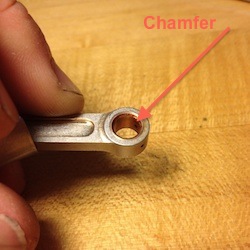
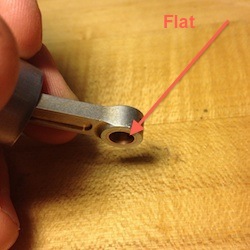
The reassembly is pretty straight forward, but there is one thing I would like to point out…which way the piston goes. If you look at the connecting rod where it slides on to the crank, you will notice that one side is flat and the other side has a very small chamfer on it. The side with the chamfer slides on to the crank pin first. The last thing that can be a little tricky is getting the piston back in to the liner. The trick to this is to make sure the ring is aligned properly then sort of roll the liner over the piston to compress the ring.
I hope you guys picked up a trick or two from this tech tip that helps your next bearing swap goes smoothly.
– Jessie


